Have you ever had a problem with your Jeep Wrangler USB Port Center Console? If so, you’re not alone.
Driving a jeep or big truck isn’t a thing for everyone. However, they require high maintenance and proper care.
In this blog post, we’ll explain the problems with Jeep Wrangler USB Port Center Console and give tips on how to fix them.
Jeep Wrangler USB Port Center Console Common Problems
1 – USB Ports Fail To Stay Connected Or The Power Cord Doesn’t Work
It’s safe to take your system apart, but don’t force anything. Push out the USB cable from the connector and re-insert it.
For other issues, check the user manual for the part in question. Also, pour water over the unit or plug and unplug your unit.
To ensure that your power port works appropriately, ensure the power cord is connected to the back of the system before you turn your system on.
3 – The Sound & Software Doesn’t Work
You can solve this symptom by checking the sound settings. If the problem persists, check the cables and make sure that each one is plugged into its USB port.
On the other hand, make sure that your software is up-to-date or that the software computer can see your device.
Try using a USB hub. When the system is connected via a USB hub, it can be seen by the operating system.
If everything else fails, connect a USB printer to one of the computer’s ports and check whether the printer can be seen.
You will usually see the printer once a software update is complete, but not the phone.
4 – The Cable Is Defective, Or The Plug Is Inserted Incorrectly
If a cable has a ventilation hole, you must hold it against a fan to cool it slowly or use a portable heat or cold pack.
Although, suppose you discovered the cable was hot after connecting the phone.
Otherwise, it is time to check if you notice a cable that seems to have come out of the phone during charging.
Jeep Wrangler USB Port Center Console Major Issues
Adaptor Cable Moved From Its Place
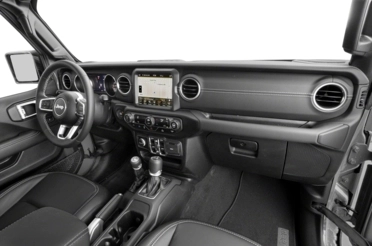
The USB port is right below the cigarette lighter at the front of the center console in the dash.
This USB port is on the inside of the console, so you need to plug your USB adaptor cable into the front of it to use it.
Once you plug the cable in, you may notice that the power cable is not plugged in. The power cable might be part of the left side of the center console. However, the power cable enters the backseat.
So, you need to swing the front portion of the right side of the console out of the way and plug that end of the power cord into the power port.
The power cord will then push against and go through the gear shift and firewall to get to the other side of the center console and plug into the power side. Once plugged into the power port, the back door window switches on and off.
However, if you plug the cable into the front part of the console, the horn doesn’t sound, and the back-side door window switch doesn’t work.
The Center Console With No USB Port
If the plug is coming out of the USB adaptor, the cable for the center console must be moved out of the way so the plug may access the USB port.
Next, you must move the USB plug up and down to get this plug in the correct position.
Then, the USB adaptor must be plugged back in and turned to its right side for the cable to hook back up correctly.
Note: You do not need to move the USB adaptor, just the cable that plugs into the front part of the console.
How to Fix Jeep Wrangler USB Port Problems
Refinish
The Jeep Wrangler USB port center console’s design is outdated and prone to damage. After the sun sets or darkens out, the console will power down and crackle.
This causes a problem because your instrument cluster will not power on the console with no USB port.
Luckily, a potential solution to this issue involves refinishing the console, which allows you to choose how to fix the console at your discretion.
Installing A USB port into a Jeep Wrangler
To install a USB port into your Jeep Wrangler, One of the first suggestions is to take your Leatherman tool and carve out the central plastic panel where the USB cord enters the console.
This will allow you to install an optional USB port in the console for charging auxiliary devices.
If you would rather have the console look like new, you can refinish it. You must remove the center console courtesy lights before taking them apart.
Step 1: Take the center console off.
Starting at the vehicle’s rear, pry up on the console release to remove it. Once this panel has popped up with the buttons down, you can pull it straight back to get it off of the car.
It can be difficult, but if you have a strong enough pull, you can remove it relatively quickly. The console release is silver and located on the back of the car.
Step 2: Remove the cup holders and row of buttons
The driver does not use the back of the console, so you do not have to worry much about it.
If you had to break it down because you needed the space, that would be different.
When I took the console out to get to the back of the car, I had to use the tray tool to break it down, but that was OK.
Also, if you plan to put the cup holders back, use the tray tool to break them down so that you do not crack anything.
That tray tool makes breaking down the console significantly less complicated. After all, the console is relatively small and doesn’t offer much space.
Step 3: Clean Everything
I am a big fan of cleaning everything before I put it away. I cleaned everything that was the drawers and a part of the console.
If you are cleaning all the same color, you could get everything off the same color. But in my case, I wanted to have a different amount of color.
I also got everything clean, so there would be no dirt in the space, and it looked neat and organized. Just like a spot of makeup remover, you want to maintain everything in its place at all times.
You want everything to be in order. Part of the stuff I cleaned was the buttons.
They probably never had to get cleaned because they were all cleaned underneath, but I didn’t know.
In the process, I also cleaned all the clear glass that I could, and still, there were a lot of light reflections, making the buttons dim because they had never been cleaned.
I also cleaned all the white parts and the cork backing.
Remove The Beneath And Find A Replacement USB Port
If you cannot find a replacement USB port within this console, you will need to remove the below part to find a USB port to install into the center console.
Rather than removing the entire console itself, this is the best option because you can keep it in the car while installing a replacement USB port simultaneously.
You will also need to remove the current USB port in the console to remove this section of the console.
First, you will need to loosen the center console latch located on the console to detach it from the console itself. Once this is done and released, you must remove the plastic clip holding the latch in the console.
Remove the black piece on the back of the center console. You may need to use a flathead screwdriver to pry it free. You need to remove the center console by removing the screw from the bottom. Lift the console up and out of the car.
Place the console on the work surface with the lid open. Remove the plastic clip from the center console on the other side of your console. Loosen the two screws and remove the screw for the front console panel.
You will now be able to slide the front console panel out of the car.
Final Words
If you’re looking for a way to add more functionality to your Jeep Wrangler, a USB port may be the answer.
With the right equipment and know-how, a USB port can be installed relatively easily.
However, before you start working on your car or truck, make sure it’s not already in need of repair.
If not, then go ahead and get started! We’ve provided all the information you need about installing a new port in your vehicle so that you can enjoy all sorts of new features without worrying about whether or not they’ll work properly.
Read More: